Rooting a robot vacuum
See these resources:
- https://robotinfo.dev -- registry for which model to buy, and details on how to root the model
- https://builder.dontvacuum.me -- firmware builder
- https://builder.dontvacuum.me/dreame/faq.txt -- faq
- https://valetudo.cloud/pages/general/getting-started.html -- valetudo instructions
- root instructions (differs on your model, see below for dreame/roborock)
- https://builder.dontvacuum.me/nextgen
- https://builder.dontvacuum.me/nextgen/dreame_gen3.pdf (master PDF)
- https://valetudo.cloud/pages/installation/dreame.html#fastboot (instructions for Valetudo)
- home assistant integration
- setup MQTT with Valetudo and it'll automatically pick up your robot
- https://valetudo.cloud/pages/integrations/home-assistant-integration.html
- this will give home assistant visibility of your robot
- to control the robot, add this card: https://github.com/PiotrMachowski/lovelace-xiaomi-vacuum-map-card
- the best card for controlling your robot, like-for-like to the native application, if not better
- you can customise pretty much anything (including zone placement on the map, icons, etc)
- to get your map on the card, follow these steps:
- https://github.com/PiotrMachowski/lovelace-xiaomi-vacuum-map-card/blob/master/docs/templates/hypferValetudo.md
- install this plugin via HACS: https://github.com/sca075/valetudo_vacuum_camera
- configure your
calibration_sourcelike below from theREADME - your robot should appear with the correct map
- setup MQTT with Valetudo and it'll automatically pick up your robot
type: custom:xiaomi-vacuum-map-card
entity: vacuum.valetudo_yourvacuum
vacuum_platform: Hypfer/Valetudo
map_source:
  camera: camera.valetudo_vacuum_camera
calibration_source:
  camera: true
internal_variables:
  topic: valetudo/your_topic
Notes for Dreame L10s Ultra rooting
TLDR: other than the USB 2.0 shenanigans mentioned earlier, it was pretty smooth... make sure you actually have a USB 2.0 port. Make sure you read the PDF completely and understand the steps.
- it went pretty well following the PDF: https://builder.dontvacuum.me/nextgen/dreame_gen3.pdf
- make sure you follow the instructions in order clearly, and you read ahead
- make sure you got the commands preprepared for when you use
fastboot- there's a cheatsheet here with the commands you need: https://builder.dontvacuum.me/nextgen/fastboot-cheatcheat.txt
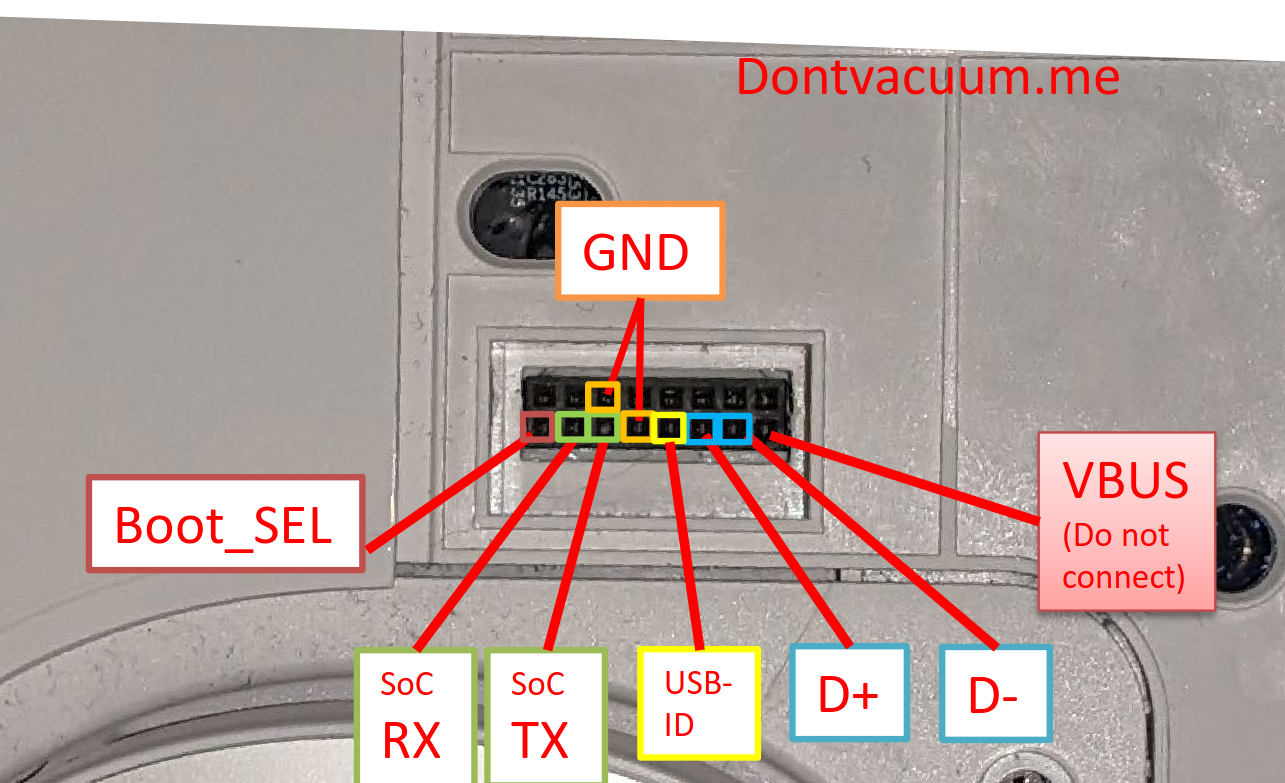
- you cannot do UART, so have to do USB with debug pins method
- it only grounded correctly if i grounded
BOOT_SELto the ground pin on the bottom row (4th one at the bottom)
- you'll know if it's grounded correctly/in debug mode cause the robot lights will start flashing and no jingle/sound will play
- to get a usb 2.0 cable, i grabbed a old mouse, opened it up and pulled the USB cable out of the PCB plug
- suggest taping the 5v on the USB A (first pin) just in case the red wire is not the 5v one, so you don't fry anything
- https://www.wikiwand.com/en/USB_hardware#Pinouts

- https://www.electroschematics.com/usb-how-things-work/
- i did it on windows 11, with a USB 2.0 port
- turns out a USB 2.0 port is super important
- you will find that you cannot flash the
boot1img later if it's over usb 3.0+ - unfortunately i had no usb2.0 port... despite what the instructions say I tried using usb C hub which had a usb 2.0 port on it
- after replugging the cable a bunch of times it let me flash
boot1via theh ub - if you see:
FAILED (data write failure (Unknown error))it's cause you need USB 2.0 for the flash
- if the device is not showing up in
fastbootor being weird, you probably need to install the drivers mentioned in the PDF - it looks like the robot will exit debug mode after a few mins after you disconnect the
BOOT_SELpin and flash the firmware, so you might need to reboot it a few times if you're slow. you want to reboot and run thefastboot flashcommands as quickly as possible later on - copy everything you run down in the terminal into notepad or somewhere safe
- backup important stuff, from faq txt file
'dd if=/dev/by-name/private | gzip -9 > /tmp/backup_private.dd.gz'
'dd if=/dev/by-name/misc | gzip -9 > /tmp/backup_misc.dd.gz'
- copy off via SCP or with the valetudo web server https://github.com/Hypfer/valetudo-helper-httpbridge
- don't lose your ssh credentials, write down the root password, or keep an ssh key